 |
|
|
Installation Stages
|
|
|
|
|
|
| |
|
Before you start creating a database of your assets we recommend you to learn program features with the help of the demo database. Choose File> Open Demo Database.
 Hardware Inspector Client/Server solution architecture Hardware Inspector Client/Server solution architecture
The following diagram shows the logical view of the Hardware Inspector Client/Server solution architecture.
Hardware Inspector Server is located on the file server and accessed by client applications either via local network or via the Internet.
The solution provides a single database for all branch offices.
It doesn't require servers like MS SQL or MySQL.
The program is known for high data safety and efficiency.
A system information tool (ASTRA32 or EVEREST) can be periodically launched from the domain script and store reports to the server.
Hardware Inspector Client imports the sysinfo data to the database and is ready to
- report on any aspect of your assets using one of its many templates;
- audit the database and alert you if anything is missing;
- track down a user who violates the software policy in your company;
- conduct an inventory session with the help of a barcode scanner and much more.
The deployment procedure consists of 6 steps:
- Step 1. Installing Hardware Inspector Server and Hardware Inspector Client;
- Step 2. Creating a new database;
- Step 3. Defining paths to data folders;
- Step 4. Importing users to the catalog from Active Directory or adding them manually;
- Step 5. Building the tree of workplaces;
- Step 6. Importing devices.
The installation procedure for the server and client applications is given in detail here.
The solution architecture allows you to give access to the database for users in remote branches.
There is no risk of revealing any critical information due to the effective multilevel access permission mechanisms.
Remote access to the database requires two things: a Hardware Inspector Client application and port-mapping in the DSL modem in the central office.
The procedure for setting up remote access to database via the Internet is given here.
2.1. Launching the Database Manager
Database Manager is the program module for creating and servicing databases. It is included in the program setup.
Choose File>Create database and Database Manager launches automatically. (Also you can launch the manager on your own by choosing Start>All programs>Hardware Inspector>Database Manager).
2.2. Creating a database
Choose File>Create database to run Database Wizard which will walk you through the following steps:
- define the path to the database folder;
- name it and make notes if necessary;
- leave checkboxes checked to automatically fill in database catalogs;
- click Run.
A new database comes with the default administrator user. By default the password is empty, so you need to set a new password for the default account.
Launch Hardware Inspector and open the database you created (Choose File>Open).
Some data (system information reports, photos of users, device models and the like) is stored not as a part of the database, but in separate folders which is convenient as you have less data for regular back up. So you need to define paths to the folders with the data which is not included in the database.
- Choose Options > Settings > Folders tab .
- Specify paths to the folders.
We recommend that you create a separate folder for each path and make them shared by all users. The paths can be stored both as the database and local settings, which allows you to define an alternative path if the base path is unavailable.
The paths can be defined in UNC format (\\SERVER\Folder), but it proves better to define it as a drive (Z:\Folder), because Windows works slower with files opened using the UNC format. Besides, it is important that a UNC resource must be permanently available, otherwise Windows will slow down considerably trying to reach out to unavailable resources.
Demo database often uses the $COMMONDOCS$ macros which refer to the Documents folder. For instance, $COMMONDOCS$Attaches\.
3.1. Path to network report templates
Define the path to customized report templates, shared by all database users. If you need none, leave the field empty.
3.2. Base path to system information reports
Define the path to the destination folder in which your system information tool will store reports on computers. It is necessary for automated device import and computer audit.
3.3. Base path to images of device models
Attaching images of device models has many uses. Storing images separately serves two purposes: it is much easier to change the folder location, because changing the folder will not break the links to images; it reduces the size of the database.
Define the base path to the folder with images.
Later you can specify the path to pictures relative to the base path. Without specifying the base path you can not specify the path to images.
3.4. Base path to user photos
You can attach a user photo to a profile in the catalog of users.
Define the base path to the folder with images.
Later you can assign photos relative to the base path. Without specifying the base path you can not specify the path to images.
3.5. Base path to images of department tree nodes
Attaching map images is necessary for the Asset Location Map feature.
Define the base path to the images that you want to attach to department tree nodes in the "Workplaces" form.
Without defining the base path you can not attach the path to images.
3.6. Base path to images of map tree nodes
Define the base path to the images that you want to attach to map tree nodes in the "Workplaces" form.
Without defining the base path you can not attach the path to images.
3.7. Base path to files attached to requests
Define the base path to the folder with files attached to Service Desk requests.
Grant access to the folder to all database operators.
If you plan use only the built-in Service Desk you can define the relative path to the folder. If you want to use the web-interface Hardware Inspector Service Desk you must specify the full path to the Attaches folder.
4.1. Creating the list of users
In the catalog of users you keep track of database operators, supporters, responsible persons, etc.
Choose Catalog > Users.
Click the Import button on the toolbar to import users from Active Directory (using a CSV file) or add them manually.
You may mark several users as favorites which moves such users to the top of the list.
We do not recommend to work under the default administrator account. It is better to create new accounts and delegate access rights. On one hand, all modifications in the database are recorded; on the other, different accounts allow you to efficiently delegate rights.
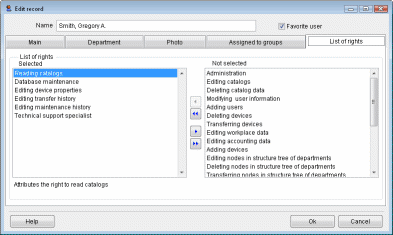
4.2. Delegating rights to program features for individual users
There are three different levels at which you can restrict users access: access rights to program features, department tree nodes (step 4.4) and device types (step 5.5).
- Choose Catalog > Users.
- Double-click a record and choose the List of rights tab.
- Select rights from the right column.
The rights can be granted either to an individual or a group of users (the latter is convenient if you need to give a typical set of rights to several users).
The List of Rights and Access tabs are available only to administrators.
4.3 Delegating rights to program features for several users
If you plan to give a typical set of rights to several users, create a user group, grant it access rights and include users to the group. The rights of a user are the sum of the rights of the group the user belongs to, plus the rights assigned individually to this user.
- Choose Catalog > Groups.
- Create a group and select rights in the List of rights column.
- Choose Catalog > Users.
- Double-click a user record and choose the Assigned to groups tab.
- Select the group with a necessary set of rights.
The List of Rights and Access tabs are available only to administrators.
The tree of workplaces two view modes departments and map. The first presents the hierarchy of workplaces in organization, the second shows their locations.
Use the context menu to manage the trees. Each node has its own context menu.
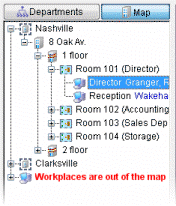
5.1. Map tree
We recommend you start with the map tree. Build the location tree that can consist of nodes such as area, building, section, floor, corridor and room (See the illustration). It is optional if use the map view mode.
- Choose Documents > Workplaces.
- Create the tree with the help of the context menu.
5.2. Departments tree
The departments tree presents the structural hierarchy of organization. It can consist of various nodes such as organization, department and workplace. You can either import workplaces or add them manually.
The number of nested levels is unlimited: a department can be nested in another department.
The maximum number of workplaces a user can work with is limited by license type (Lite up to 15 workplaces, Standard up to 50 workplaces, Pro up to 200 workplaces, Elite unlimited).
Remote offices can be presented as separate organizations and located at the root of the tree.
You can link map tree nodes to departments tree nodes and toggle between the view modes. For instance, Example.Ltd> IT department > Sales Department Manager (departments tree mode) can be presented as Nashville> 8 Oak Av.>1 floor > Room 103 (map tree mode).

Workplaces can be of four types: standard, storage, write-offs, public. Specifying a workplace type is convenient due to various initial settings in the program. For example,storage nodes are default source nodes when replacing expendables. Retired nodes are default destinations when retiring assets. And public workplaces are necessary for reports on network printers, copy machines and the like.
5.3. Importing workplaces
You can save time by importing workplaces either from the network area or the selected IP range. It imports workplaces to the selected department/organization and fills in the Network names fields in the Network tab. The uniqueness check on network names is performed within the parent node.
- Right-click a parent tree node (an organization or department).
- Choose Import workplaces, select the IP range and click Scan.
- Select the workplaces and click Import.
5.4. Specifying access rights to nodes of department tree and map tree
You can restrict access to certain tree nodes, which is quite useful for security purposes. For instance, all users may be denied access to IT storage or users from remote offices may be denied access to the main office. Access rights are specified in the Access tab in the "Workplaces" form, which is available only to administrators.
- Open the Workplaces form and
- Stand on the node and open the Access tab.
- Right-click the field, choose Add and specify the rights for the current node.

The hierarchy of the rights is defined by Up and Down buttons.
5.5 Automated assignment of system information reports to workplaces
Fill the Network name field for each workplace (the "Workplaces">Network tab), which is done automatically if you import workplaces from the network area.
Create the login script for launching a system information tool (ASTRA32 or EVEREST) using the $HOSTNAME$ macros
System information reports generated by ASTRA, ASTRA32 or EVEREST can be stored on the file server. If the command-line of your sysinfo tool contains the $HOSTNAME$ macros, the computer network name will be either in the file name, or the name of the folder where reports will be stored.
You need to define the base path in the program settings to the folder with the reports. The macros in the file (folder) name automatically links the report in the resource to the workplace with this network name.
Description:
\\server\cfgReports\$HOSTNAME\$YEAR\$YEAR_$MONTH_$HOSTNAME.ini - the launch command to generate the sysinfo report and save to the defined path;
/RJ - creates the report in the INI format;
$YEAR - the macros that inserts the current year to the name of the folder or file;
$HOSTNAME - the macros that inserts the network name of the computer to the name of the folder or file;
$MONTH - the macros that inserts the current month to the name of the folder or file;
/Q - instructs the program to be silent so that users do not know the computer is tested.
In this case ASTRA32 will create folders after the computer network names. There will be a folder for each computer. When a new report is generated, an older report of the same month and year will be overwritten. So each folder will contain twelve reports for the year.
The must be defined like this:
\\server\CfgReports\$HOSTNAME$\*.*
If you are interested only in the current reports, you can keep reports in one folder. The launch command will look like this:
ASTRA32 /RJ \\server\cfgReports\$HOSTNAME.ini [Q]
Wneh a new report is generated, an older report of the same month and year will be overwritten.
The must be defined like this:
\\server\CfgReports\$HOSTNAME$.ini
The help file contains examples of command line for EVEREST
You can import devices with the help of Import basket or Workplace audit tools. The latter is more convenient as it has new features, such as importing several devices at one operation, importing network parameters and others. Also you can import devices from a CSV file. Or you can add devices manually.
According to the program concept, all information about device models and types is stored in the catalog, which is convenient as data on devices can be excessive. Whereas workplaces store such data as links to the catalog as well as installation and accounting details. It means that a device model must be added to the catalog of models and types, before a device can be imported to a workplace. But it is no problem as our import tools follow the sequence automatically.
Setting for automated import of devices
The easiest way to build up a database is to import devices and network settings from system information reports generated by ASTRA32, ASTRA, EVEREST or AIDA32. On the file server we recommend that you
create a resource with a write right;
launch either EVEREST or ASTRA32 from the domain script;
include the path to the resource in the command-line;
use $HOSTNAME$ macros which insert the host name to avoid the reports overwriting each other.
In this case the base path to system information reports may look like this:
\\Server\CfgReports\$HOSTNAME$\*.* or Z:\CfgReports\$HOSTNAME$\*.*
This allows you to automatically assign reports to workplaces and make them available for Hardware Inspector. The $HOSTNAME$ macros must be written in workplace properties as the the Network name in the Network tab. The program does automatically when you import workplaces from the network area, or you can do it manually.
6.1. Importing devices with the Import basket
Choose Document > Workplaces > Import tab. Choose a system information report and click Import button. If there's no report in the tab, it means it is not assigned to the workplace (see 4.5). We recommend to add device models to the catalog carefully, because various batches of the same device models may differ with variants of manufacturer or model name. For example, Samsung and Samsung Corp.. To avoid adding clones to the catalog you can create aliases for such cases.

Import basket works in the following sequence:
- add manufacter name to the catalog (create an aliase for it);
- add model name to the catalog (create an aliase for it);
- add device to the workplace.
If you import only new devices, click All to catalogs to fill the catalogs of Manufacturers and Models and types at one operation.
6.2. Importing devices with the Computer audit
Workplace audit has several advantages compared to the Import basket: customizable interface, import rules, processing several devices at one operation and many more.
Choose Document > Workplaces > Import tab. Right-click a system information report and choose Computer. If there's no report in the tab, it means it is not assigned to the workplace (see 4.5).
We recommend to add device models to the catalog carefully, because various batches of the same device models may differ with variants of manufacturer or model name. For example, Samsung and Samsung Corp.. To avoid adding clones to the catalog you can create aliases for such cases.
Computer audit automatically opens tabs in the following sequence: Manufacter > Model > Device.
If you import only new devices, you can add all data to the catalogs of Manufacturers, and Models and types at one operation as well as add all devices to a workplace.
6.3. Importing devices from a CSV file
If you have been inventorying devices in some other program, you can export them to a CSV file, and then import it to the database.

6.4. Adding devices manually
Choose Document> Workplaces. Choose a workplace, right-click the Devices tab area and choose Add. You need to select a device model from the catalog and fill in all relevant details (Installation, Accounting, Warranty and the like, which is of course optional). If the catalog has no device model you are adding, right-click the respective device type and choose Add model.
6.5 Specifying access rights to device types
You can restrict access to certain device type. For instance, copy machine specialists may not bothered by other devices than copy machines, printers, expendables and the like. It is also useful for security purposes.
Access rights are specified in the Access tab of the catalog of Models and types, which is available only to administrators.
These are the 6 steps to deploy Hardware Inspector Client/Server.
Further on you can edit catalogs, fine-tune the database and so on. Find more in the program manual, FAQ or contact our support specialist via
|


